Atmospheric Tide (大気潮汐)とな。

きっかけ
ログ取りの基本、気温、湿度、大気圧をずいぶん前から手を変え品を変えて測定している。これまでに、不快指数に応じて表示LCDのバックグラウンドの色が変わるようにしたり、指数がある値を超えるとGoogle Homeが教えてくれるようにしたりして遊んできた(うるさすぎてやめた)。
記録するのは、ログ好きだからそれ自体に喜びを感じてしまうのと(月刊ログの発刊を心待ちにしている<-ググらないでね。そんなものないので)、記録から何かのパターンを探したいというのが目的で、とくに突然雨が降るときの予兆を見つけたいと長らく思っている。雨の前に風の向きが反転したり、気温が急激に変わることがちょくちょくあるので、(あと、雨のにおいが先にしてくることもあるが、これはどう拾えばいいのでしょうか)そういう変化のパターンを見つけて検出できるようにして、雨がどっしゃーと来る前に、「窓閉めたほうがいいですよ」とGoogle Homeに言わせたりしたい。
パターンは目で見つけたい。そのためには測定値をグラフにしてみるのが一番。測定は随時(毎分)行っているので、いつでも見えるようになっているほうがいい。ということで、googleのChartsを使ってこのwebに埋め込む、をやろうと思ったのですが、それより先にAdafruit IO上でサクッとグラフにして、しばらく眺めてみることにしました。
気温や湿度の変化をみると、いつごろクーラーをつけたか、いつ頃起きだしたか、いつ頃Youtube見ながらやせただの、燃焼だのいいながら運動したか、などを読み取ることができ、それなりに面白いのですが、それよりも、気圧の変化にきれいな日周期パターンがでたのでそれを紹介します。
測定機材
材料
- Adafruit HUZZAH32 – ESP32 Feather Board (PRODUCT ID: 3405)
- Adafruit 0.96″ 160×80 Color TFT Display (PRODUCT ID: 3533)
- Adafruit BME280 I2C or SPI Temperature Humidity Pressure Sensor (PRODUCT ID: 2652)
- LED (red, yellow, green, blue)
- 330 ohm resistor
- breadboard
- jumper wire
- Adafruit IOアカウント(制限はありますが無料で利用できます)
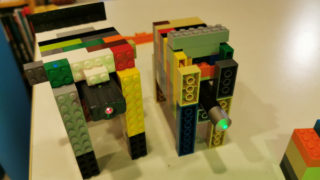
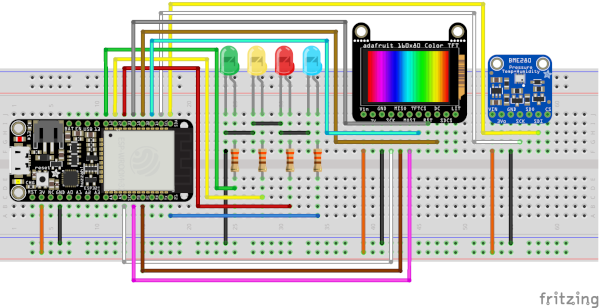
接続図
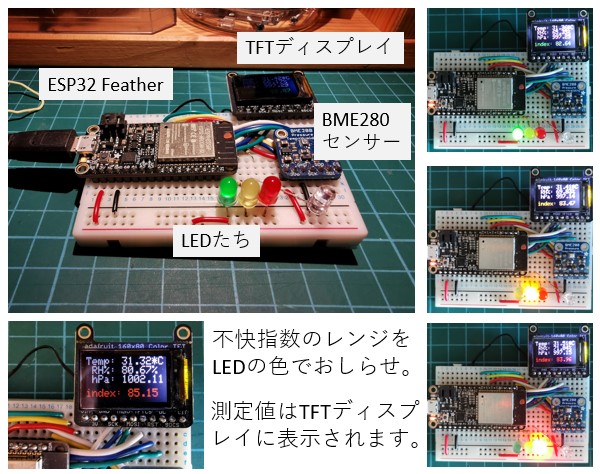
説明図
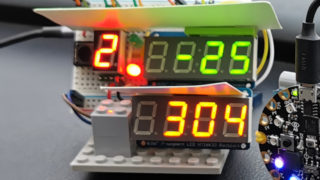
実物はこんな見た目です。USBケーブルからの電源で動いています。
観察される気圧のパターン
BME280からの測定値は、ネットワークを旅してAdafruit IOのページでグラフになります。温度と湿度は8時間分、気圧(右上)は7日分を表示しています。なんだか、気圧に似た形が続いていますね。
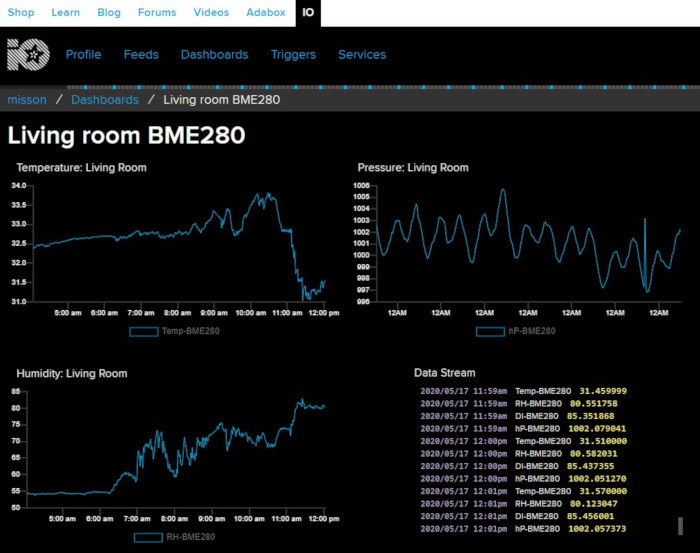
12AMから12AMまでの一日分に枠を当てはめてみると、

一日の区切りにパターンがそろうのがわかります。一日分をとってみると、どれも次の形をしています。
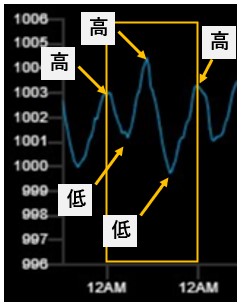
なんだこりゃ?一日に2周サイクルが回っているようだ。一日2周といえば、潮の満ち引き?でもこれ気圧ですし。そんなの聞いたことないぜ、と思って少し検索してみると、なぬ!
普通に出てくるし。なんでこんなにはっきりしていて、よく知られていることをまるで知らないでいたのでしょうか。こりゃまだまだそういうことがありそうで楽しみですな。
コード:実際にやってみる人に
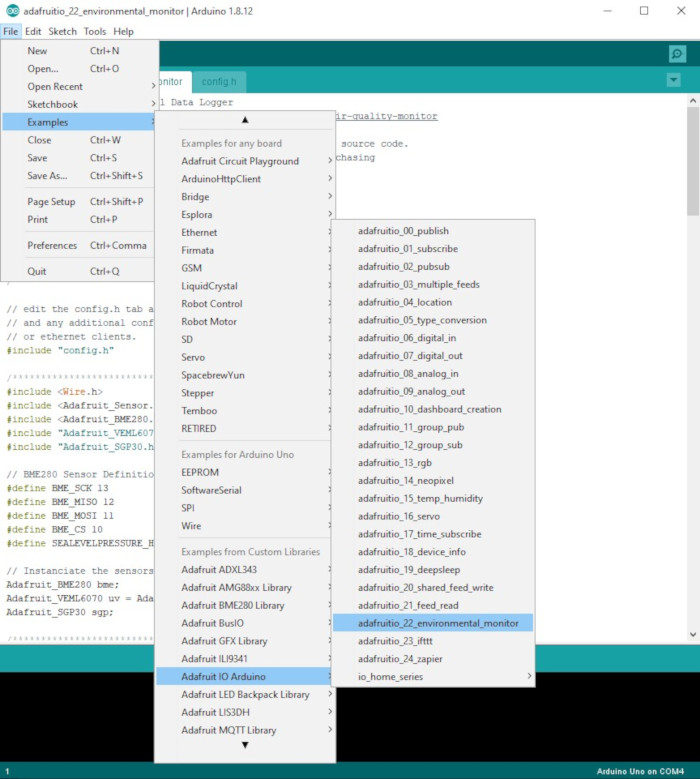
Mainのコード(BME280-station3-AdafruitIO.ino)ともにconfig.hが必要です。詳しいことはAdafruitのページを参照してください。長いので、スクロールが大変ですが、実際に動いているコードを載せます。
こういうコードはたいてい0から書き上げる必要はなく、ライブラリについてくるexampleコードを書き換えればできあがります。今回は、Adafruit IO Arduinoについてきた、arduino_22_environmental_monitorをもとにして書き換えています。
BME280-station3-AdafruitIO.ino
// examplesにある、adafruitio_22_environmental_monitorを改変
// BME280-station3-AdafruitIO.ino

// Adafruit IO Environmental Data Logger
// Tutorial Link: https://learn.adafruit.com/adafruit-io-air-quality-monitor
//
// Adafruit invests time and resources providing this open source code.
// Please support Adafruit and open source hardware by purchasing
// products from Adafruit!
//
// Written by Brent Rubell for Adafruit Industries
// Copyright (c) 2018 Adafruit Industries
// Licensed under the MIT license.
//
// All text above must be included in any redistribution.

/********** Adafruit IO Configuration **********/

// edit the config.h tab and enter your Adafruit IO credentials
// and any additional configuration needed for WiFi, cellular,
// or ethernet clients.
#include "config.h"

/*********** Sensor Configuration **********/
#include <Wire.h>
#include <Adafruit_Sensor.h>
#include <Adafruit_BME280.h>

// BME280 Sensor Definitions
#define SEALEVELPRESSURE_HPA (1013.25)

// Instanciate the sensor
Adafruit_BME280 bme; // I2C

// Something mine =============== mine
// vars
int ticket = 1;
float temp;
float humidity;
float pressure;
float d_idx;
float y_threshold = 83.0;
float r_threshold = 83.5;
// 160x80 TFT, ST7735 =============== preps
#include <Adafruit_GFX.h>    // Core graphics library
#include <Adafruit_ST7735.h> // Hardware-specific library for ST7735
#include <SPI.h>
// Feather Huzzah32
#define TFT_CS         14
#define TFT_RST        15
#define TFT_DC         32
Adafruit_ST7735 tft = Adafruit_ST7735(TFT_CS, TFT_DC, TFT_RST);
// LEDs =============== preps
const int greenLED = 12;
const int yellowLED = 27;
const int redLED = 33;

const int blueLED = 21;

/********** Example **********/
// Report interval control with millis
unsigned long startMillis;
unsigned long currentMillis;
unsigned long saveInterval = 60000; //ms

// set up the feeds for the BME280
AdafruitIO_Feed *temperatureFeed = io.feed("Temp-BME280");
AdafruitIO_Feed *humidityFeed = io.feed("RH-BME280");
AdafruitIO_Feed *diFeed = io.feed("DI-BME280");
AdafruitIO_Feed *pressureFeed = io.feed("hP-BME280");


void setup() {
  // LED
  pinMode(greenLED, OUTPUT);
  pinMode(yellowLED, OUTPUT);
  pinMode(redLED, OUTPUT);
  pinMode(blueLED, OUTPUT);

  // start the serial connection
  Serial.begin(9600);
  // wait for serial monitor to open
  while (!Serial);
  Serial.println("Adafruit IO Environmental Logger");

  // set up BME280
  setupBME280();

  // TFT, ST7735
  // OR use this initializer (uncomment) if using a 0.96" 160x80 TFT:
  tft.initR(INITR_MINI160x80);  // Init ST7735S mini display
  // black screen
  tft.fillScreen(ST77XX_BLACK);
  delay(1000);
  // set top comes to the top
  tft.setRotation(3);

  // Use OLED display
  OLEDSetupDone();
  delay(1000); // 1 sec

  // connect to io.adafruit.com
  Serial.print("Connecting to Adafruit IO");
  io.connect();

  // wait for a connection
  while (io.status() < AIO_CONNECTED)
  {
    Serial.print(".");
    delay(500);
  }

  // we are connected
  Serial.println();
  Serial.println(io.statusText());

  // Use OLED display
  AfIOReady();
  delay(3000);

  // black screen
  tft.fillScreen(ST77XX_BLACK);

  // take start millis
  startMillis = millis();
}


void loop() {
  // io.run(); is required for all sketches.
  // it should always be present at the top of your loop
  // function. it keeps the client connected to
  // io.adafruit.com, and processes any incoming data.
  io.run();

  // take current millis
  currentMillis = millis();

  Serial.println("Taking Sensor Reads...");

  // read BME data
  temp = bme.readTemperature();
  humidity = bme.readHumidity();
  pressure = bme.readPressure() / 100.0F;
  // calculate discomfort index
  d_idx = 0.81*temp+0.01*humidity*(0.99*temp-14.3)+46.3;
  // display it
  displayReads(temp, humidity, pressure, d_idx);

  Serial.print("Temp: ");
  Serial.print(temp);
  Serial.print(" RH: ");
  Serial.print(humidity);
  Serial.print(" hPa: ");
  Serial.print(pressure);
  Serial.print(" idx: ");
  Serial.print(d_idx);
  Serial.println();

  if (currentMillis - startMillis >= saveInterval) {
    // send data to Adafruit IO feeds
    temperatureFeed->save(temp);
    humidityFeed->save(humidity);
    pressureFeed->save(pressure);
    diFeed->save(d_idx);
    startMillis = currentMillis;
    Serial.println("Data sent to Adafruit IO!!!");
    digitalWrite(blueLED, HIGH);
  }

  // LED control
  if (d_idx >=r_threshold) {
    Serial.println("### Hits red threshold --- (1)");
    blink_red();
    if (ticket == 1) {
      // reset ticket
      ticket = 0;
    }
  } else if (d_idx >=y_threshold) {
    blink_yellow();
  } else {
    on_green();
    ticket = 1;
  }

  digitalWrite(blueLED, LOW);

  delay(100);
}


// functions ===============
void OLEDSetupDone() {
  tft.setCursor(0, 0);
  tft.setTextColor(ST77XX_CYAN);
  tft.setTextSize(2);
  tft.println("OLED ready.");
}

void AfIOReady() {
  tft.setCursor(0, 33);
  tft.setTextColor(ST77XX_CYAN);
  tft.setTextSize(2);
  tft.println("Af. IO ready.");
}

void displayReads(float t, float rh, float p, float idx) {
  // erase all
  tft.fillScreen(ST77XX_BLACK);
  delay(100);
  // display!
  tft.setCursor(0, 0);
  tft.setTextSize(2);
  tft.setTextColor(ST77XX_WHITE);
  //tft.setTextSize(2);
  tft.print("Temp: ");
  tft.print(t);
  tft.println("*C");

  tft.print(" RH%: ");
  tft.print(rh);
  tft.println("%");

  tft.print(" hPa: ");
  tft.println(p);

  // the index
  if (idx >=r_threshold) {
    tft.setTextColor(ST77XX_RED);
  } else if (idx >=y_threshold) {
    tft.setTextColor(ST77XX_YELLOW);
  } else {
    tft.setTextColor(ST77XX_GREEN);
  }
  tft.setCursor(0, 56);
  tft.print("index: ");
  tft.println(idx);
}

void on_green() {
  // just turn on the green and wait 10 seconds
  digitalWrite(greenLED, HIGH);
  delay(10000);
  digitalWrite(greenLED, LOW);
}

void blink_yellow() {
  // about 10 sec
  int i = 0;
  while (i < 5) {
    digitalWrite(yellowLED, HIGH);
    delay(1000);
    digitalWrite(yellowLED, LOW);
    delay(1000);
    i ++;
  }
}

void blink_red() {
  // about 10 sec
  int i = 0;
  while (i < 10) {
    digitalWrite(redLED, HIGH);
    delay(500);
    digitalWrite(redLED, LOW);
    delay(500);
    i ++;
  }
}

// Set up the BME280 sensor
void setupBME280() {
  bool status;
  status = bme.begin();
  if (!status)
  {
    Serial.println("Could not find a valid BME280 sensor, check wiring!");
    while (1);
  }
  Serial.println("BME Sensor is set up!");
}
config.h
Adafruit IO Configと、WIFIのところのみ変更が必要です。
/********** Adafruit IO Config **********/
// visit io.adafruit.com if you need to create an account,
// or if you need your Adafruit IO key.
#define IO_USERNAME "ご自分のものをここに"
#define IO_KEY "ご自分のものをここに"

/********** WIFI **********/
// the AdafruitIO_WiFi client will work with the following boards:
//   - HUZZAH ESP8266 Breakout -> https://www.adafruit.com/products/2471
//   - Feather HUZZAH ESP8266 -> https://www.adafruit.com/products/2821
//   - Feather HUZZAH ESP32 -> https://www.adafruit.com/product/3405
//   - Feather M0 WiFi -> https://www.adafruit.com/products/3010
//   - Feather WICED -> https://www.adafruit.com/products/3056
//   - Adafruit PyPortal -> https://www.adafruit.com/product/4116
//   - Adafruit Metro M4 Express AirLift Lite ->
//   https://www.adafruit.com/product/4000
//   - Adafruit AirLift Breakout -> https://www.adafruit.com/product/4201
//   - Adafruit AirLift Shield -> https://www.adafruit.com/product/4285
//   - Adafruit AirLift FeatherWing -> https://www.adafruit.com/product/4264

#define WIFI_SSID "ご自分のものをここに"
#define WIFI_PASS "ご自分のものをここに"